Your Cart is Empty
Add description, images, menus and links to your mega menu
A column with no settings can be used as a spacer
Link to your collections, sales and even external links
Add up to five columns
Add description, images, menus and links to your mega menu
A column with no settings can be used as a spacer
Link to your collections, sales and even external links
Add up to five columns

Oat & almond pulp granola
Luvele Life

Turn your left-over nut pulp into cluster-style granola!
If you have discovered the joys of making your own nut milk, you may be wondering what you can do with all the leftover pulp. If you’ve paid a premium for raw nuts, the last thing you want is the bulk of them going to waste! Of course, throwing out the leftovers would also mean tossing a bunch of perfectly good fibre and nutrients straight into the bin.
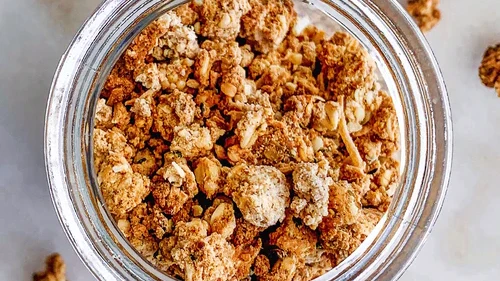
Luckily, you absolutely don’t have to let your nut pulp go to waste. This recipe is an easy way to salvage those leftovers and turn them into something completely new and totally delicious. With a few added ingredients, you can turn your plain almond pulp into moreish cluster-style granola that is perfect for sprinkling on smoothies, homemade yogurt or fresh fruit. The moisture in the pulp will help the clusters to form, so this is best made on the day you make your almond milk.

I’ve kept this recipe quite simple, but it does have a lovely warm, nutty flavour. If you wanted to get a bit creative, you could add in some chopped nuts or seeds or dried berries. If you add any berries or fruit, either add it for the last five minutes or once you’ve removed the granola from the oven, as the sugar in the fruit means that it will burn very quickly. Stored in an airtight container, this will last in the pantry for a week. I’d be impressed if it made it that long, though!
This post is proudly featured in collaboration with Sarah MacDonald of Sarah's Spoonful.


Oat & almond pulp granola
Luvele
Rated 5.0 stars by 1 users
If you have discovered the joys of making your own nut milk, you may be wondering what you can do with all the leftover pulp. If you’ve paid a premium for raw nuts, the last thing you want is the bulk of them going to waste! Of course, throwing out the leftovers would also mean tossing a bunch of perfectly good fibre and nutrients straight into the bin.
Ingredients
- Pulp from 1 cup of raw almonds (a little less than 1 cup)
- ½ cup quick oats
- 2 tablespoons tahini
- 1 tablespoon maple syrup
- 1 tablespoon olive oil
- 2 tablespoons shredded coconut
- 1 tablespoon hemp seeds
- ½ teaspoon sea salt
- 2 teaspoons cinnamon
Directions
- Preheat the oven to 160ºC.
Combine the almond pulp, quick oats, coconut, hemp seeds, sea salt and cinnamon in a mixing bowl and stir well.
In a separate bowl, combine the tahini, maple syrup and olive oil.
Pour the wet mixture over the dry ingredients and stir until evenly incorporated.
Spread the granola out evenly on a lined baking tray. It should form small clusters, so do not break up the mixture too much.
Bake for about 30 minutes, flipping halfway.
Allow to cool before breaking up any clumps and storing in an airtight container. 8. Serve over yoghurt, smoothie bowls, or with your homemade milk!
PIN THIS RECIPE

Oat & almond pulp granola

Turn your left-over nut pulp into cluster-style granola!
If you have discovered the joys of making your own nut milk, you may be wondering what you can do with all the leftover pulp. If you’ve paid a premium for raw nuts, the last thing you want is the bulk of them going to waste! Of course, throwing out the leftovers would also mean tossing a bunch of perfectly good fibre and nutrients straight into the bin.
Luckily, you absolutely don’t have to let your nut pulp go to waste. This recipe is an easy way to salvage those leftovers and turn them into something completely new and totally delicious. With a few added ingredients, you can turn your plain almond pulp into moreish cluster-style granola that is perfect for sprinkling on smoothies, homemade yogurt or fresh fruit. The moisture in the pulp will help the clusters to form, so this is best made on the day you make your almond milk.

I’ve kept this recipe quite simple, but it does have a lovely warm, nutty flavour. If you wanted to get a bit creative, you could add in some chopped nuts or seeds or dried berries. If you add any berries or fruit, either add it for the last five minutes or once you’ve removed the granola from the oven, as the sugar in the fruit means that it will burn very quickly. Stored in an airtight container, this will last in the pantry for a week. I’d be impressed if it made it that long, though!
This post is proudly featured in collaboration with Sarah MacDonald of Sarah's Spoonful.

PIN THIS RECIPE

Subscribe
Sign up to get weekly healthy recipes & information on new product releases.
Item is added to cart


